In Oracle, typically you create a database when you install the software. However if you either skipped the database creation part during installation or if you want to create one more database on the same host, then there are two ways of doing this.
- Using the Database Configuration Assistant (DBCA) graphical tool.
- Using the CREATE DATABASE SQL statement.
This article guides you through the creation of an Oracle Database using the DBCA tool.
Creating a database with DBCA
- Start Database Configuration Assistant (DBCA).
- On Windows operating system go to Start → All Programs → Oracle Home_Name → Configuration and Migration Tools → Database Configuration Assistant.
- On Linux or Unix go to Oracle Home Directory and run the command.
dbca
- Click Next on the DBCA Welcome screen.

Database Configuration Assistant - Welcome - Select Create a Database and click Next.
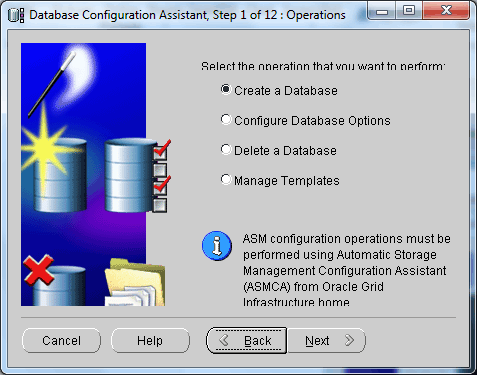
Database Configuration Assistant - Operations - Oracle provides two templates from which you create your database or you can create it from your own custom templates. The templates provided by oracle are based on the workload of the database -
- General Purpose or Transaction Processing
- Data warehouse
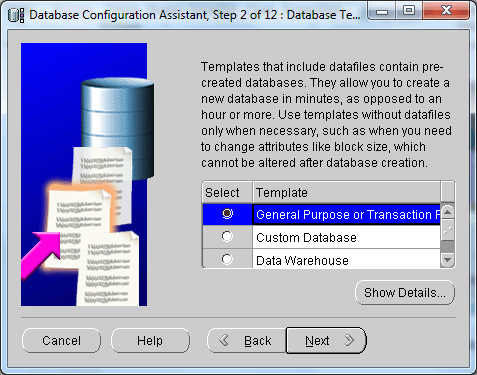
Database Configuration Assistant - Templates - Enter Global Database Name in the form database_name.domain_name. In the SID box enter the database name. Then click Next.
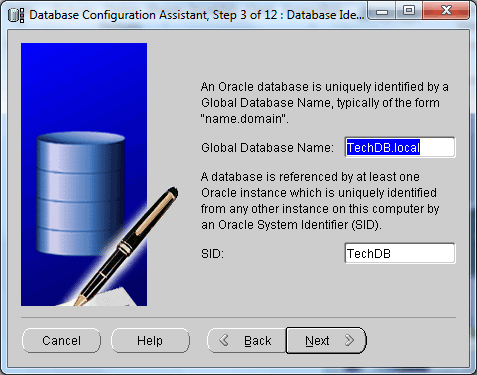
Database Configuration Assistant - Identification - In the Management Options screen select the checkbox Configure Enterprise Manager if you want to manage your database with Oracle Enterprise Manager. Then click Next.

Database Configuration Assistant - Management Options - Enter passwords for SYS and SYSTEM users. Then click Next.
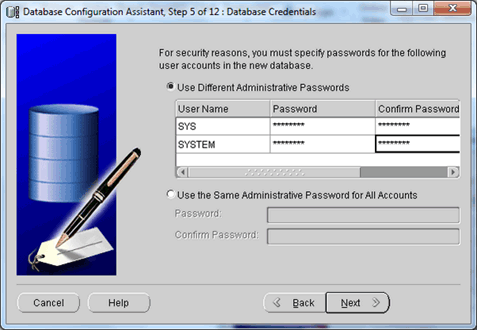
Database Configuration Assistant - Database Credentials - In the next step you specify the storage type and storage locations for the database files. Storage type can be File System or Automatic Storage Management. You can choose one of the following option for storage location -
- Use Database File Locations from Template - The file locations specfied in the template are used.
- Use Common Location for All Database Files - Specify a new directory location to save all database files.
- Use Oracle Managed Files - With this option you only specify a default location and Oracle database will take care of the management of the database files by itself.
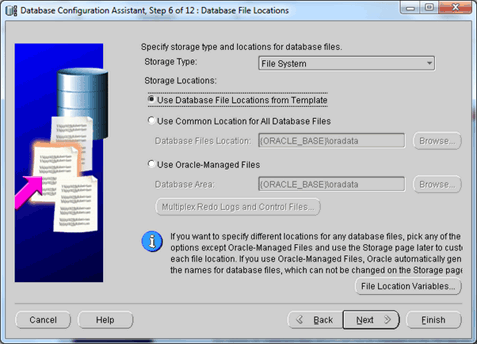
Database Configuration Assistant - Database File Locations - In the Recovery Configuration screen you can specify a location to store and manage file related to backup and recovery such as redo logs, archive logs etc.,. This area is also called FRA or Flash Recovery Area. You can also specify whether to run the database in ARCHIVELOG mode or NOARCHIVELOG using the Enable Archiving check box. Click Next.
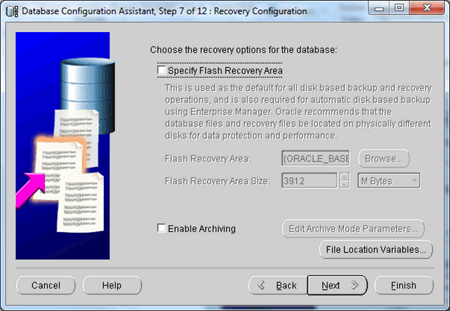
Database Configuration Assistant - Recovery Configuration - The Database Content screen of the DBCA gives you the option to load data from Sample Schemas or with your own custom script. Click Next.

Database Configuration Assistant - Database Content - The Initialization Parameters screen contain three tabs for various initialization parameters such as Memory, Sizing, Character Set and Connection Mode.
Memory
Use this tab to specify memory management methods.- Typical - Using the slider you can select the percentage of physical memory that should be allocated.
- Custom - Lets you specify advanced memory configurations.
Sizing
In this tab you can specify the block size and the maximum number of operating system user processes that can be simulataneously connected to this database.Character Set
Specify the character set to use. You can select the default charater set, Unicode character set or Choose from a list.Connection Mode
Choose from one of the following connection modes.- Dedicated Server Mode - Dedication server process for each user process. Choose this option when total number of clients is expected to be less than 50
- Shared Server Mode - Client connections can share a pool of resources allocated by the database.

Database Configuration Assistant - Initialization Parameters - The next screen shows you the storage stucture of Control files, Data files and redo logs. You can make any changes that you want to the files locations and click Next.
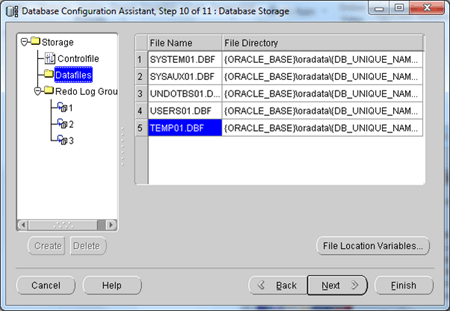
Database Configuration Assistant - Storage - Finally you have the option to Create your database, Save it as a template to use later or Generate database creation scripts for future use. Select one option and click Finish.
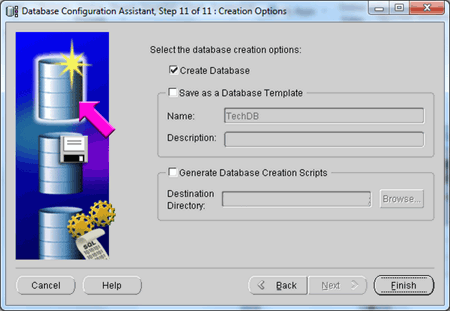
Database Configuration Assistant - Creation Options - A confirmation window shows you a summary of the configuration that you selected. Click OK to proceed.

Database Configuration Assistant - Confirmation
You can also use DBCA to delete a database, change the configuration of an existing database and to manage database templates. If you do not need the graphical interface then you have the option to run DBCA in silent mode. To get help on this, run dbca -help from command line.


