If you've taken photos of an event, place, or of your friends, but end up finding it not too impressive or memorable, you'll want to edit those photos. Using the right settings will bring that lost atmosphere back, and you'll be able to relive those moments. Editing photos may also help photos look less amateur and more professional, by creating extraordinary photos which will catch your viewer's attention immediately. Currently, there are many photo-editors you can use to edit photos with ease, one of which is RawTherapee.
You can download RawTherapee from the link here.
Here are a few easy hacks to edit photos in RawTherapee:
Manipulating Exposure
Manipulating and changing several settings under Exposure is an easy way to add more depth and colour to your photos. Shown below is how the interface will look once you open up the image.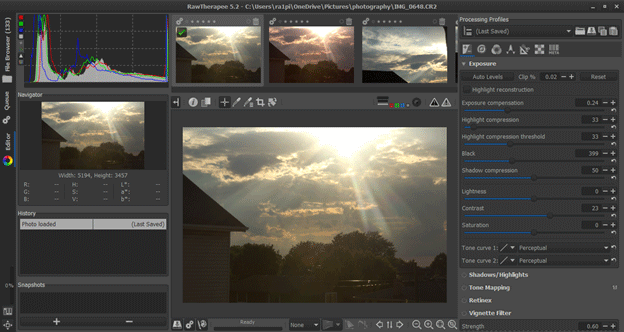
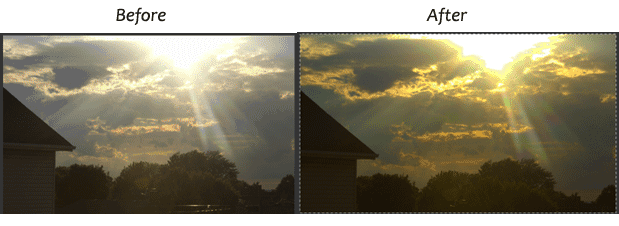
If not already on the Exposure section, click  on the ribbon with icons on the upper-right hand side of the interface. Move the cursor over to the Exposure drop-down section and go to Exposure compensation, which is first on the list. This will help brighten or darken the photo using its original exposure settings to compensate for excessively bright/dark images. Click & drag the circular button right to increase/brighten or left to decrease/darken. Once satisfied, move the cursor to the heading, Black. This will change the darkness of the photo by increasing/decreasing the amount of blackness in the photo, which aids in distinguishing dark areas of images. Click & drag the circular button right to increase the blackness or left to decrease the blackness. Then, adjust Contrast, which changes the intensity of light and dark colours, and Saturation, which adjusts the strength and amount of colour in the photo. Click & drag the circular button, underneath the corresponding title, right to increase the amount or left to decrease it. Shown below is an example of how changing these settings yielded a better image.
Increasing Vibrance
Vibrance helps to increase the intensity of colours in a targeted way, in which certain types of colours are intensified more than other types of colours. This greatly enhances the photo's depth without making it too unrealistic.
Click  on the ribbon with icons on the upper-right hand side of the interface to go to the Color section. Click on
  (both the power button and the Vibrance heading), and you will find a drop down menu shown below.
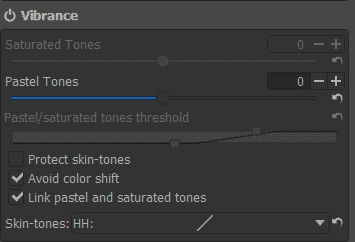
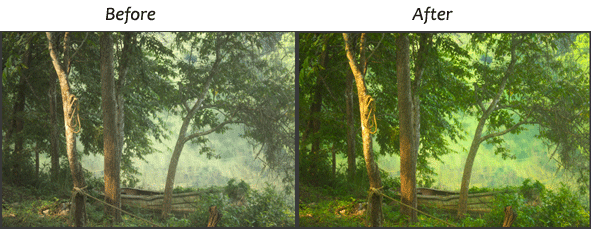
Untick the box for Link pastel and saturated tones, which will highlight the Saturated Tones section and the Pastel/saturated tones threshold. Under the heading Pastel Tones, click & drag the circular button right to intensify or left to dampen the strength of the pastel colours. Once satisfied, under the heading Saturated Tones, click & drag the circular button right to intensify or left to dampen the strength of the saturated colours. Make sure that the pastel colours are stronger than the saturated colours, since doing otherwise will make the photo a bit too jarring. Using the values 25 for Saturated Tones and 70 for Pastel Tones, shown below is an example of how the photo was enhanced using these settings only.
Tweaking select areas using Tone Mapping
Tone Mapping is an advanced tool that enables you to pick and choose which areas of the photo you want to be enhanced.
Start by clicking  on the right-hand side ribbon with icons to go to the Exposure section. Under the heading Exposure, click
  beside Tone curve 1 to open a drop-down menu; click
  in order to edit the tone curve. Shown below is the graph which will appear.
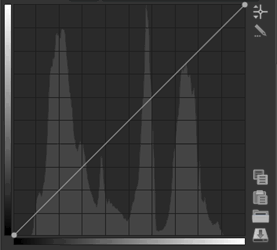
Click at any point in the middle of the white line and drag it slowly either upwards or downwards while observing the picture. Certain parts of the picture will be noticeably affected. The contrast and exposure of the picture will change as you move the point, but focus on the part of the picture which seems to be yielding the most results in terms of detail and contrast. When you are satisfied with how that part looks like, release the point and you will end up with a curved graph.
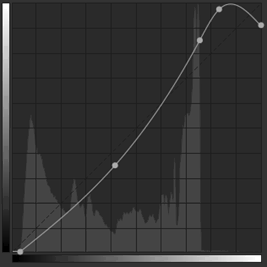
The next step will be to focus on the other parts of the picture. Add more points by clicking on the curve so you can manipulate specific areas of the image. Drag these points upward for lighter tones and downward for darker tones. Dragging points right will increase contrast, while dragging it left will decrease contrast; however, do not drag it right or left too much as it will damage the image. Here is a sample tone curve shown below:
Once you are satisfied, you can save the tone curve using  and open it using
  . Shown below is an example of how editing the tone curve had enhanced certain details in the photo.
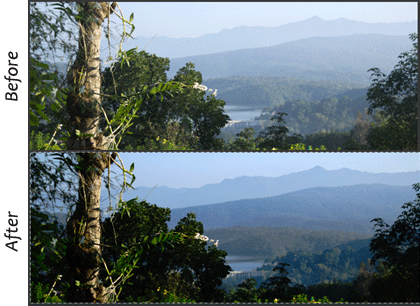
Photo-editing software can be used to turn bad or mediocre photos into great pictures. As you can see, editing photos with these simple techniques can greatly enhance the quality of your pictures.


