LAMP stands for Linux, Apache, MySQL, PHP. This is a popular combination of open source software to create a web server that can host dynamic websites and web applications. This article assumes you have a server with Ubuntu installed. You also need to have either root access or a non-root account with sudo privileges.
We are going to use apt package manager for our installations. So it is a good idea to update apt before you start.
$ sudo apt-get update
(Step 1) Install Apache
We can install Apache using the default package manager apt. The command for this is:
$ sudo apt install apache2
You may also use apt-get install, but for newer Ubuntu versions apt install is recommended.
You can check if the apache2 service has started by the systemctl command.
$ sudo systemctl status apache2
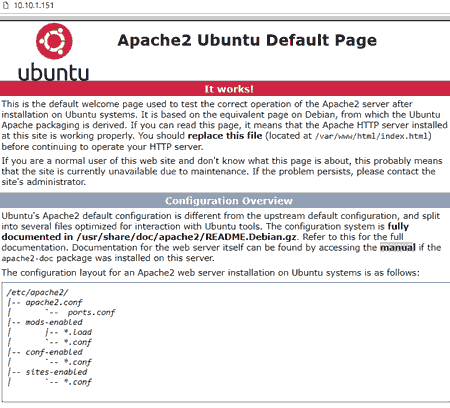
Now if you open a browser and type the server's IP address you should see the Apache2 Ubuntu Default Page open. Example: If your IP address is 10.10.1.151 visit http://10.10.1.151/. If you are unable to see this just check your network configuration and firewall rules, firewall rules are explained later in this article.

(Optional Step) Fine tune Apache2
The config file for Apache2 is /etc/apache2/apache2.conf. You can specify various directives here to fine tune the performance (example KeepAlive Settings). You may also add ServerName directive to set your domain name or IP address as the ServerName.
Restart apache2 service to implement the config changes.
$ sudo systemctl restart apache2
(Optional Step) Set firewall rules
The default firewall configuration tool for Ubuntu is ufw which is inactive unless you enable it. To enable firewall, run
$ sudo ufw enable
While the default set of rules (called profile) is fine for the average user, you may want advance rules on your webserver.
To list all application profiles, run
$ sudo ufw app list

Available applications:
  Apache
  Apache Full
  Apache Secure
  OpenSSH
To see "Apache Full" profile
$ sudo ufw app info "Apache Full"
Profile: Apache Full
Title: Web Server (HTTP,HTTPS)
Description: Apache v2 is the next generation of the omnipresent Apache web
server.

Ports:
  80,443/tcp
To allow incoming traffic for "Apache Full" profile
$ sudo ufw allow in "Apache Full"
Rule added
Rule added (v6)
You can check if the allow in rule by visiting your IP Address again in a browser.
For advance ufw configuration please refer the ufw manual.
(Step 2) Install MySQL
Use apt package manager to install package mysql-server
$ sudo apt install mysql-server
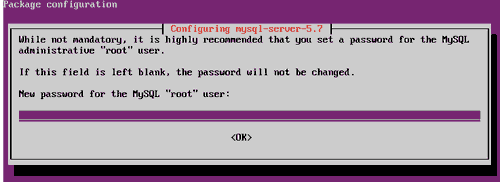
During the installation you will be prompted to set a password for MySQL root user. Select a strong password.

(Optional Step) Securing MySQL Installation
Once the installtion is finished you can optionally run a script called mysql_secure_installation to make your MySQL installation more secure. This script allows you to set a password for root accounts, prevent root access to the database from outside of localhost, remove anonymous user and test database.
$ mysql_secure_installation
(Step 3) Install PHP 7.0
You may choose older version of PHP, but we are choosing the latest version at the time of writing this article, which is PHP 7. We also need to install additional packages and extensions for Apache and MySQL support.
$ sudo apt install php7.0 libapache2-mod-php7.0 php7.0-mysql
The config file for PHP is /etc/php/7.0/apache2/php.ini. You may edit this file to make configuration changes to improve performance, enable error logging etc. The /etc/php/7.0/apache2/php.ini file has example configuration that has been commented out by a semicolon at the beginning of the line. You may just remove the semicolon to enable these and fill in the required configuration parameters.
Once you have finished configuring, restart apache service for the changes to take effect.
sudo systemctl restart apache2
(Step 4) Verify PHP Installation
The default document root for Ubuntu 16.04 is /var/www/html/. To verify the document root go to /etc/apache2/sites-enabled and check the config files. The default name would be 000-default.conf.
$ grep "DocumentRoot" /etc/apache2/sites-available/000-default.conf
     DocumentRoot /var/www/html
Create a file called test.php in /var/www/html with the following contents.
$ sudo vi /var/www/html/test.php
<?php
phpinfo();
?>
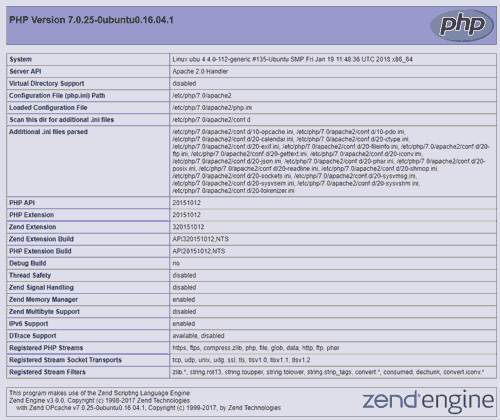
Save this file and load the page test.php. If your server's IP Address is 10.10.1.151 visit http://10.10.1.151/test.php in your browser. You will see a page with your PHP version and configuration.

That's it, your LAMP server is ready. Depending on what you plan to do next, you may need to install additional packages. The packages for cURL, JSON, and CGI support are php7.0-curl, php7.0-json and php7.0-cgi respectively.
If you are planning to install wordpress you also need additional modules php-curl, php-gd, php-mbstring, php-mcrypt, php-xml and php-xmlrpc


