Oracle VM VirtualBox gives you several options to configure networking of your virtual machines. Every Virtual Machine in your VirtualBox can have up to 8 network adapters and these network adapter can be any of the following six hardware types.
- AMD PCNet PCI II (Am79C970A)
- AMD PCNet FAST III (Am79C973) This is the default
- Intel PRO/1000 MT Desktop (82540EM)
- Intel PRO/1000 T Server (82543GC)
- Intel PRO/1000 MT Server (82545EM)
- Paravirtualized network adapter (virtio-net)
You can also configure each network adapter in your Virtual Machine to operate in one of the following modes:
- Not Attached
- Network Address Translation (NAT)
- NAT Network
- Bridged Networking
- Internal Networking
- Host Only Networking
- Generic Networking
Let's look at these networking modes in detail and analyse which networking mode to use and how.
Configuring Virtual Machine Network
To configure your Virtual Machine network, Open the Virtual machine Settings and select Network
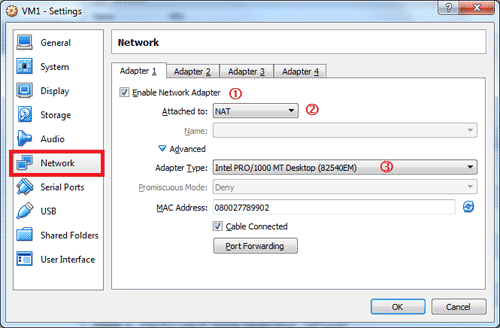
You can configure up to four network cards from Network section of the settings window. If you need to add more network cards then you can do so from command line using VBoxManage modifyvm command.
- To add a network adapter to your Virtual Machine just select the Enable Network Adapter check box.
- Depending on the networking mode that you want you can select one of the options(see Virtual Networking Modes section below) from the drop down box with the label Attached to.
- You may also change the adapter type, promiscuous mode policy, mac address and cable connected settings from under advanced options.
Virtual Networking Modes
Networking Modes defines the connection between - a Guest Virtual Machine and Host machine, different Guest VMs on the same Virtual Box, Guest VM and other machines on the network and Guest VMs connection to the internet. You select the networking mode by selecting one of the options from the "Attached to" drop-down list.
Not Attached
In this mode, the network adapter will behave as if no Ethernet cable is attached to it - which means no connection.
NAT
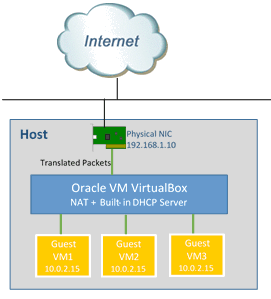
NAT (Network Address Translation) is the default networking mode used when you create a new VM. In this mode VirtualBox uses its built-in DHCP server to assign the IP address 10.0.2.15 to VMs network adapter. When the Guest VM tries to make an outbound connection such as accessing the internet, VirtualBox will translate the IPv4 packets and from the Guest VM and forwards it to its destination and also translates response packet back to the Guest VM.
This networking mode is only used when the Guest VM acts like a client that access a public network (or internet). In this mode you cannot have Guest VM as a server or in other words you cannot initiate a SSH or telnet connection to Guest VM.
When to use NAT mode?
If all you need is internet access from your Guest VM this is the best option as it requires no additional configuration.
For example you have a Guest VM that runs a Linux or a Windows desktop operating system and you want to install additional packages / upgrades etc.,
Do no use NAT mode if the Guest VM runs in server mode (Web server, FTP server etc) as you cannot initiate a connection to the VM.
NAT with Port Forwarding
The main drawback of NAT is that you cannot connect to the Guest VM from another machine on the network. There is a workaround to this problem - Port Forwarding. Port Forwarding will check the inbound packets and forwards it to the Guest VM based on the IP address and port numbers. The source/destination IP address and Port numbers used for Port Forwarding are defined using rules that you can create from Port Forwarding Rules window. To access this windows expand Advanced section and click Port Forwarding
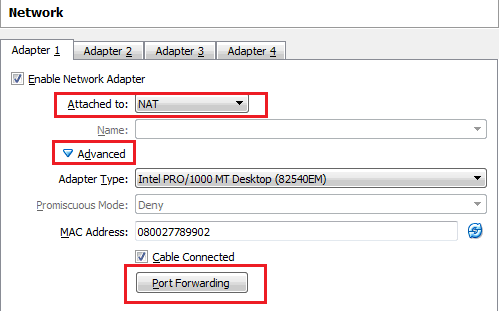
In the Port Forwarding windows click on the + icon to add a new rule. For example you can add a rule which forwards all packets coming in to port 2222 of host to port 22 of Guest VM.
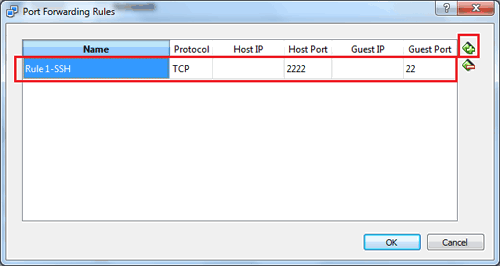
This rule enables you to make a SSH connection (on port 22) to Guest VM from a external machine by simply connecting to the host's IP address and port 2222.
Bridged Networking
In the Bridged networking mode, the virtual Network adapter is bridged to a physical NIC on your host so you can access your Guest VMs just as you access the host.
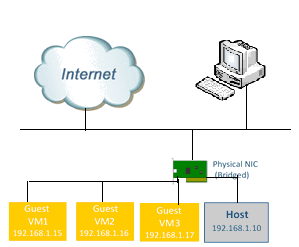
To enable Bridged Networking, select Bridged Adapter in the Attached to drop down list and then select a host NIC from the drop down corresponding to the Name field.

When to use Bridged Networking
Use Bridged networking if you have Guest VMs that run as servers or clients and you need to make a network connection(SSH, FTP, TCP/IP etc.,) to those VMs from client PCs and other devices on your network.
One drawback with this mode of networking is that if you have multiple NICs and if you switch connections between the NICs then you have to reconfigure the bridge. For example you have a wired and wireless connection and you created the bridge initially with the Wireless adapter. If you move to a location where you do not have wireless access and you switch to a wired connection then you need to reconfigure the bridged to use the wired connection adapter.
Internal Networking
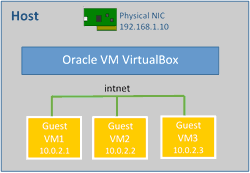
All Virtual machines in a VIrtualBox that use Internal Networking mode connects to an isolated internal network and can talk to each other. Even the Host is not connected to this private network.
Host-Only Networking
In Host-Only Networking the Host and the Guest VMs are on a private network. It is similar to Internal Networking but only difference is in this mode the Host is also connected to the internal network and can provide DHCP services to the Guest VMs.
To configure Host-Only networking you need to first create a VirtualBox Host-only Ethernet Adapter.
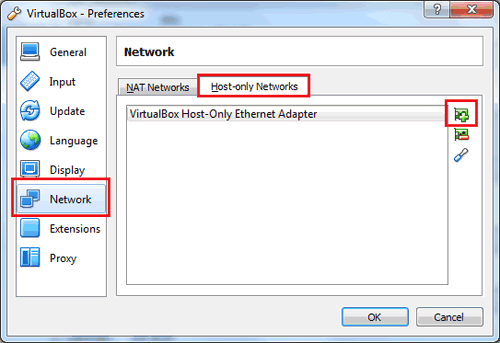
In the VirtualBox Manager window, Select File → Preferences. Select Network and click Host-only networks tab.
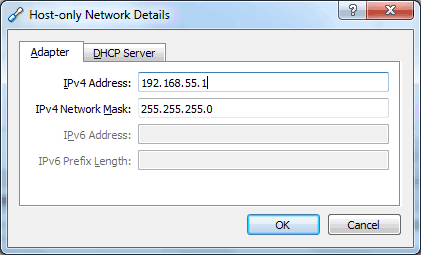
You can also edit the properties of of the Host-only adapter to set an IP address or configure DHCP
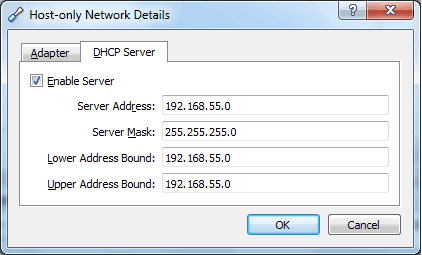
Finally from the Network Settings of the Virtual Machine you select Host-only Adapter in "Attached to" field and the name of the adapter that you created above.

Generic Networking
This mode is very rarely used. In this mode you can create a UDP tunnel to interconnect two Virtual Machines running on different hosts or you can create VDE (Virtual Distributed Ethernet) networking which allows you to connect your VM to Virtual Distributed Ethernet switch.


