Time is very important, for humans and for machines and it's no different for Windows. Many programs, services and components in Windows requires to know precise time to work correctly (Kerberos authentication for example). To maintain the time correctly, Windows 10 offers the Windows Time service and the w32tm.exe tool which allows you to synchronize the time of your local computer with another computer on your local network or on the internet. This synchronization is performed using the Network Time Protocol (NTP) and occurs at specific interval.
Windows 10 computers that are not joined to a domain synchronise its time automatically with an Internet Time Server. The default Internet Time Server is time.windows.com.
For computers that are on the domain, the time is synchronised with the domain controller.
View or change time server in Windows 10
The following steps outlines how to view or change the time server used to synchronise your computers clock.
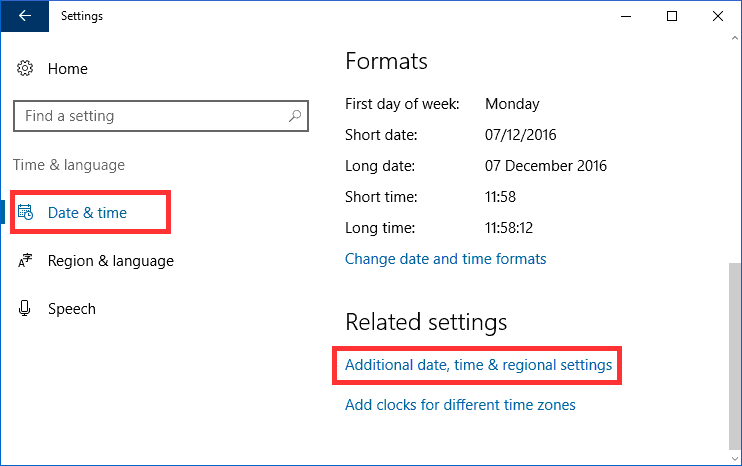
- Click Start → Settings → Time & language.

- Select Date & Time from the left side menu and then click Additional date time & regional settings.

- Click Set the time and date.

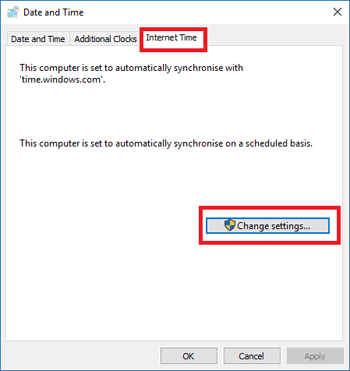
- Select the tab Internet Time. It will show you the current NTP server used to synchronize the time.

- Click Change Settings.
- Select the checkbox Synchronise with an Internet time server.

- Select a time server from the drop down box or enter you own server address.
- Click Update now.
- Click Ok to close the dialog.
Changing time synchronisation interval in Windows 10
A windows 10 computer synchronises with a time server to update the clock at specific intervals. In case of computers that are part of a domain, the default interval is 1 hour. But in case of stand-alone systems the update interval is 7 days. If you want your computer to synchronise the time more frequently, you can achieve that by changing the value for a registry key.
- Open registry editor. (Type regedit in the search box)
- Open the following registry path.
HKEY_LOCAL_MACHINE\SYSTEM\CurrentControlSet\Services\W32Time\TimeProviders\NtpClient
- Right click the key SpecialPollInterval and select modify.
- Select Decimal as Base. The default value in the Value data box will be 604800 which is the poll interval in seconds (604800 seconds = 7 days).
- Enter a new value in the Value data box. For example if you want to set the poll interval to one day, enter the 86400.
- Click OK.
- Close registry editor and restart your computer.


