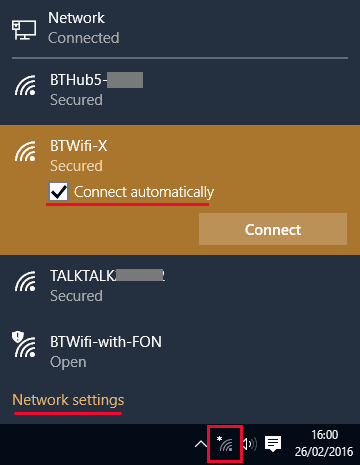
Connecting to an available wireless network in Windows 10 can be as easy as clicking on the Network icon on the taskbar, selecting the WiFi network you want to connect, enter a password if its a secure network and click Connect.
To automatically connect to that network everytime it is available, select the Connect Automatically checkbox.
To disconnect from a network, select the network and click Disconnect.
WiFi settings can be modified any time by selecting Settings > Network & Internet > WiFi > Manage WiFi settings on your PC.

One of the settings you will find here is WiFi Sense. Windows 10 Wifi Sense lets you automatically connect to known open Wifi networks, or those networks shared to you by Facebook friends, Skype Contacts or Outlook contacts.
You should atleast share one network with your contacts before you can acess their shared networks. Only the networks are shared, your passwords and credentials will be safe.

Forget a Wireless Network Profile
To delete, forget or remove a wireless network profile go to Settings > Network & Internet > WiFi > Manage WiFi settings. Scroll down to the bottom of the settings page where you will find all network profiles under Manage known networks. Click on the network you want to remove and click forget.

Setting a preferred connection
The list of available network connections you see when you click on the network icon in the taskbar is sorted in the order of their priority.
In the example (Figure 1) shown at the beginning of this article, the wired network has the highest priority. The WiFi conenction BTHub5-xxx has the second highest priority and BTWifi-X has the third highest priority. When two WiFi networks are available at the same time, the network profile with the highest priority will be connected. Mobile boradband networks have the leat priority as they are normally metered connections. You can change the priority of the network profiles by typing in a few commands.
Open a command prompt in elevated mode (Right click and select Run as administrator). List the available network profile with the following command.
C:\> netsh wlan show profiles
Profiles on interface WiFi:

Group policy profiles (read only)
---------------------------------
    <None>

User profiles
-------------
    All User Profile     : BTHub5-XXXX
    All User Profile     : BTWifi-with-FON
The profiles are listed in the order of their priority.
To change the priority for a profile, for example, set BTWifi-with-FON higher priority than BTHUB5-XXXX, run the following command
C:\> netsh wlan set profileorder name="BTWifi-with-FON" interface="WiFi" priority=1
Priority order of profile "BTWifi-with-FON" is updated successfully.
Now list the profiles again
C:\> netsh wlan show profiles

Profiles on interface WiFi:

Group policy profiles (read only)
---------------------------------
    <None>

User profiles
-------------
    All User Profile     : BTWifi-with-FON
    All User Profile     : BTHub5-XXXX
You will notice that the priority has changed and now BTWifi-with-FON will be listed first.


