Raspberry Pi 3 the successor of Raspberry Pi 2 was launched in February 2016 and comes with some exciting new hardware upgrades such as builtin Wi-Fi and Bluetooth with a chip antenna, quad-core 1.2GHz CPU and 1GB RAM that runs at 900MHz. Microsoft started releasing Insider Preview builds of Windows 10 IoT Core for Raspberry Pi 3 since its arrival and this article shows you how to install and configure Windows 10 IoT Core Insider Preview on Raspberry Pi 3.
I. Download Windows IoT flash file
1. Download Windows 10 IoT Core Insider Preview from this download link.
2. Select the edition - Windows 10 IoT Core Insider Preview and click Confirm. Select the latest Build number from the list.
3. Select the device - Raspberry Pi and click Confirm.
4. A download link will be generated which is valid for 24 hours. Click Download Now.
5. Wait for download to complete then open Downloads folder of your PC and find the .iso file that you downloaded.
6. Double click on the .iso file. This will mount the .iso file and open the contents for you.
7. Double click on installer package .msi file.
8. Accept the License Agreement and click Install.
9. If User Account Control prompts "Do you want to allow this app to make changes to your computer" then press Yes.
10. Click Finish after the installation is completed.
II. Flash image to SD Card
1. Launch Windows IoT Dashboard. If the dashboard is already installed type iot in search box and select Windows IoT Dashboard Desktop App. If dashboard is not installed, follow the steps described in the previous article Installing Windows 10 IoT Dashboard.
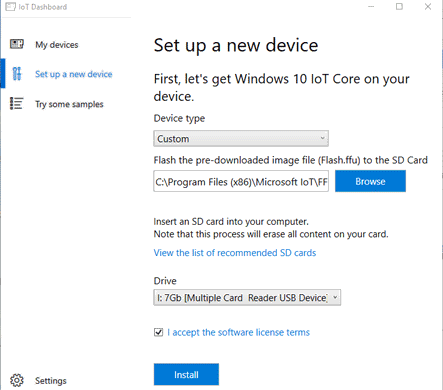
2. Click Setup a new device.

3. In Device Type list box select Custom.
4. Click Browse and select the flash.ffu file from the default location - C:\Program Files (x86)\Microsoft IoT\FFU\RaspberryPi2
5. Select your flash drive from the drive box.
6. Click Accept the License terms check box.
7. Click Install.
8. Click Continue on the confirmation box.
9. If you are prompted "Do you want to allow this app to make changes to your computer" then press Yes.
10. Wait for the imaging to complete when the Dashboard will tell you that the SD card is ready.
III. Startup and Initial Config
1. Insert the SD into your Raspberry Pi and connect the power.
2. If you have a monitor, plug it in and you can see the Windows 10 IoT screen.
3. Connect the Raspberry Pi to your router using an Ethernet cable. You could also use wifi but ethernet is the recommended method.
4. On the Windows IoT Dashboard click on My Devices. After you power on the Rapberry Pi for the first time it may take 5-10 minutes for the device to appear on this list.

5. Click on your device and click the Edit icon below Settings.
6. Click Change device password if you want to change the default password which is p@ssw0rd
7. In device name box, enter any name and click Apply.
8. A message box tells you that the Raspberry Pi needs to be restarted. Click Continue to restart the device.
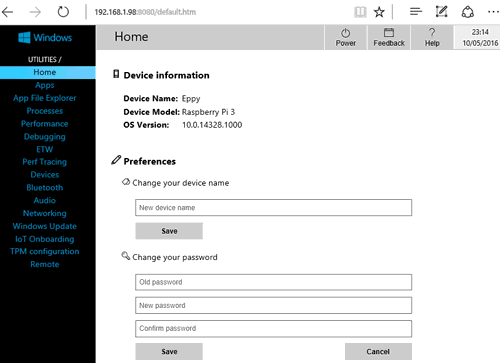
9. After restart click on the Browse icon below Open in Device Portal.
10. Enter username and password to connect to the Windows Device Portal.

Windows Device Portal provides several management capabilities such as to view device information, install/uninstall apps, shutdown/reboot your device, monitor performance, configure network, bluetooth, wifi and audio.
Also read the latest Installation Guide here


