Blinky is simple app to blink an LED that is connected to your Windows IoT Core device. The source code and documentation for this app is available in C++ or C# from the link here. But in this tutorial here we'll create this same app in VB.NET. This app does not have a UI and will run as a background service in your Winows IoT device, which can be Raspberry Pi 2 or 3, MinnowBoard Max or DragonBoard.
What you need
- Raspberry Pi 2 or 3 with Windows 10 IoT Core installed. See Install Windows 10 IoT on Raspberry Pi
- LED
- Resistor 220Ω (or higher upto 1KΩ)
- Breadboard
- Connector wires
- A development PC that has:
- Windows 10 operating system ( Developer mode enabled )
- Visual Studio Community 2015 Update 1
- Windows IoT Core Project templates
Connecting the LED to Raspberry Pi
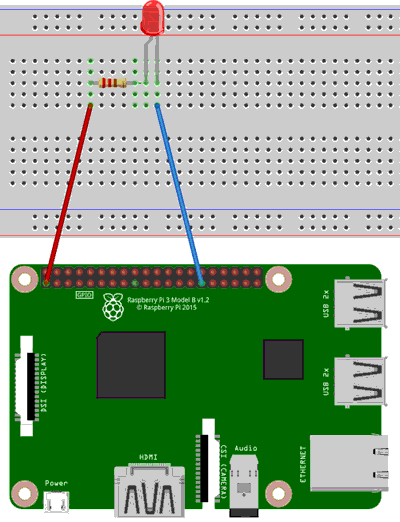
- Connect the negative end of the LED (shorter leg, cathode) to GPIO 5, which is pin number 29 in Raspberry Pi 2 and Raspberry Pi 3.
- Connect the positive end of the LED (the longer leg, anode) one end of the resistor.
- Connect the other end of the resistor to one of the 3.3V pins, which is pins 1 and 17 in Raspberry Pi 2 and Raspberry Pi 3.

Build the app in Visual Studio 2015
- Open Visual Studio 2015.
- Select File → New → Project from the main menu.
- In the New Project dialog select Visual Basic → Windows → Windows IoT Core in the left pane under Installed → Templates
- Select Background Application (IoT) from the middle pane.
- Enter a name and location for your app.
- In the Solution drop down box select create new solution and give a name for the solution.
- Click OK.
- Open StartupTask.vb from Solution Explorer and copy and paste the below source code to StartupTask class file. This source code is explained in detail in the next section.
StartupTask.vb source code
Imports Windows.ApplicationModel.Background
Imports Windows.Devices.Gpio
Imports Windows.System.Threading

Public NotInheritable Class StartupTask
    Implements IBackgroundTask

    Const LED_PIN As Short = 5 'GPIO Pin(5) = Physical Pin(29) = WiringPi Pin (21)
    Const INTERVAL As Short = 2   'Interval in seconds
    Private gpio
    Private pin As GpioPin
    Private pinValue As GpioPinValue
    Private blinktimer As ThreadPoolTimer
    Private cancelled As Boolean = False
    Private deferral As BackgroundTaskDeferral = Nothing


    Public Sub Run(taskInstance As IBackgroundTaskInstance) Implements IBackgroundTask.Run

        'Handler for cancelled background task
        AddHandler taskInstance.Canceled, New BackgroundTaskCanceledEventHandler(AddressOf onCanceled)

        'Background task continues to run even after IBackgroundTask.Run returns
        deferral = taskInstance.GetDeferral()

        'Initialize GPIO
        initGPIO()

        'Create a periodic timer
        blinktimer = ThreadPoolTimer.CreatePeriodicTimer(New TimerElapsedHandler(AddressOf blinktimer_tick), TimeSpan.FromSeconds(INTERVAL))

    End Sub

    Private Sub onCanceled(sender As IBackgroundTaskInstance, reason As BackgroundTaskCancellationReason)
        cancelled = True
    End Sub

    Sub blinktimer_tick(state As Object)

        If Not cancelled Then
           'Toggele Pin Value
            If (pinValue = GpioPinValue.High) Then
                pinValue = GpioPinValue.Low
            Else
                pinValue = GpioPinValue.High
            End If

            pin.Write(pinValue)
        Else
           'if the task is cancelled
           'Stop the timer And finish execution
            blinktimer.Cancel()
            deferral.Complete()
        End If
    End Sub

    Private Sub initGPIO()
        'Get the default GPIO controller for the system
        gpio = GpioController.GetDefault()

        If Not gpio Is Nothing Then
            'Open a connection to the GPIO Pin
            pin = gpio.openpin(LED_PIN)
            pinValue = GpioPinValue.Low

            'Write Pin value low to turn on LED
            pin.Write(pinValue)

            'Set the pin for output
            pin.SetDriveMode(GpioPinDriveMode.Output)
        End If

    End Sub

End Class
Source code walkthrough
Imports Windows.Devices.gpio
The namespace Windows.Devices.gpio contains the necessary classes that allow you to read the current status and switch on/off the GPIO pins from the app.
AddHandler taskInstance.Canceled, New BackgroundTaskCanceledEventHandler(AddressOf onCanceled)
Enable the app to recognize cancellation request that is made against your app.
deferral = taskInstance.GetDeferral()
Toggling the LED on/off is performed inside an timer which runs asynchronously. The above line tells the system not to stop timer task when the Run method is finished.
initGPIO()
This is the function that initializes the GPIO. It will get the GPIO controller for the system and opens GPIO pin 5.
blinktimer = ThreadPoolTimer.CreatePeriodicTimer(New TimerElapsedHandler(AddressOf blinktimer_tick), TimeSpan.FromSeconds(INTERVAL))
Create a periodic timer that calls the blinktimer_tick function every 2 seconds. You can adjust the blink speed by changing the constant value INTERVAL
Sub blinktimer_tick(state As Object)
Inside this function first we check if a cancel request was recieved in which case the timer is stopped and the app execution is completed. Otherwise toggle the pin value to high or low, there by changing the LED off and on respectively.
Build and Deploy your App
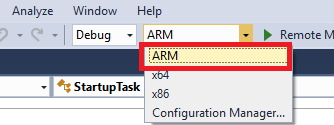
- In the Visual Studio 2015 standard toolbar select the architecture as ARM.

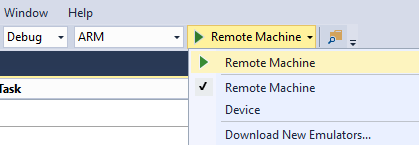
- Select Remote Machine from the dropdown list as Target device.

- From the main menu select Build → Build Solution
- Confirm the build succeeded with out errors.
- From main menu select Build → Deploy Solution.
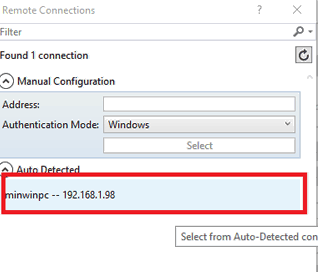
- Select your device in the Remote Connections dialog. You could enter the device name or IP address or select from the Auto detected list of devices.

Run the app on Windows IoT
- Open Device Portal. On Windows IoT Core Dashboard, Click My Devices from the left pane. Then right click your Windows IoT Device and select Open in Device Portal. Alternatively, if you know the IP address of your device, open a web browser and connect to that IP address on port 8080. (http://your-ip-address:8080)
- Select Apps fro the left side menu.
- Click on the start icon ▷ next to your app name.
- You will now see the LED blink every 2 seconds.


