OPENTech Guides
Launch the first application and configure devices
by Oleg Skidan on 06th March 2018
Let's see how our application works on the devices.
The first thing to remember is that we can run our application on a physical device or on different emulators. To do this, you need to find the launch panel in the menu:

On this panel we are interested in two buttons. The green play button allow us to launch our application on the selected device. Button with a gray drop down icon allows us to debug our application. The second startup mode is needed in case you want to take a step-by-step look of the application execution. It is usually used when you want to find any errors in the application.
Click the normal launch of the application and see the device selection panel on which we want to launch our application:
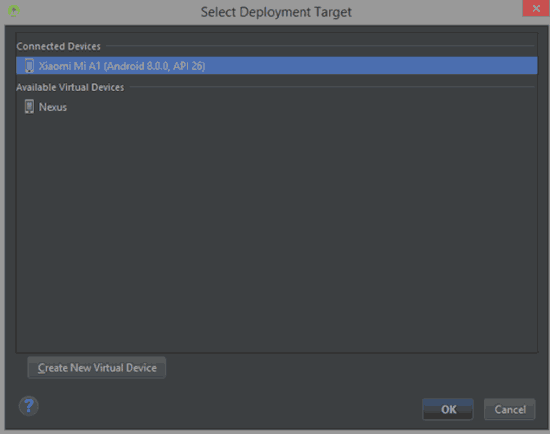
On this screen you will see all available virtual devices (which run on the emulator) and all Android devices connected to your computer. If you do not have available virtual devices, you can create them by clicking on the Create New Virtual Device button. Click here to learn abouthow to create a virtaul device
Attention! Many novice Android developers will notice that when you connect a physical device to the computer via USB, the device does not appear in the list of devices to start. This is due to the fact that you need to enable developer settings and allow debugging via USB on the physical device. Let's see how this can be done.
First of all, it's worth mentioning that some unscrupulous mobile retailers may make the the warranty void if they find the developer options is turned on. In fact, turning on developer options does not harm the device in any way. Nevertheless, there are specific options for the developer that can make the screen "glare", allocate visual components to the grid or write different performance digits in the corner of the screen. Remember that this is not a breakdown of the device, but is easily turned off in the developer settings. Do not let yourself be deceived.
How to enable developer mode
On your android smartphone, go to Settings → System → About Phone. On a Samsung Galaxy phone it is Settings → System → About Device and on LG devices it is Settings → About Phone → Software information
One of the information you see there is the Build Number.
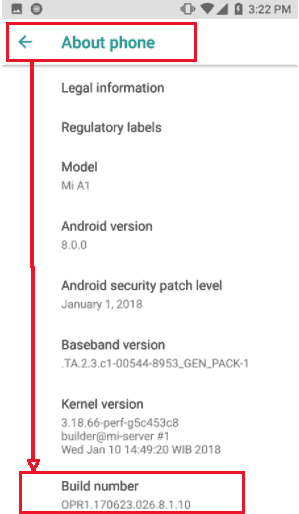
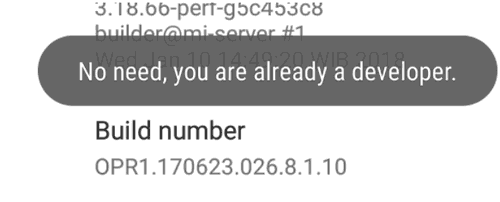
Tap on Build Number seven times. After first two taps you'll see how many taps remaining to enable developer options. After the 7th tap you will see the message No need, you are already a developer. or No need, deeloper mode has already been enabled.
Now, go back to the Settings → System and you will find a new menu item Developer Option
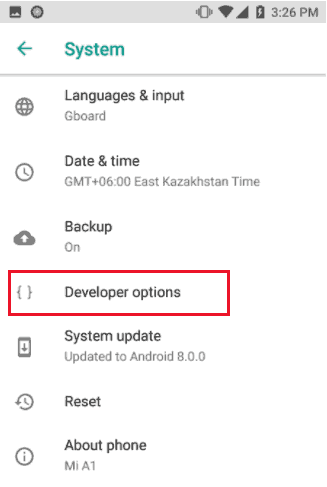
Go to Developer Options menu and turn the settings On:
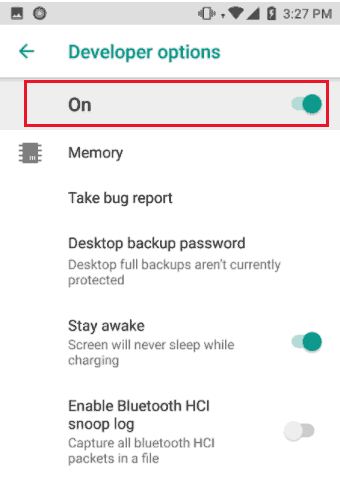
You have now enabled developer options, but that is not all. Examine the other settings carefully, there are a lot of them. They are associated with applications, event tracing, a screen and many others. Try to be very attentive to these settings and just do not press anything. Find the Debugging settings group and enable USB debugging. This item is required for us so that our device can receive applications from Android Studio and work with them directly.
Attention! In some cases, you will be prompted for confirmation to allow the current (connected) computer to debug the device. Allow it.
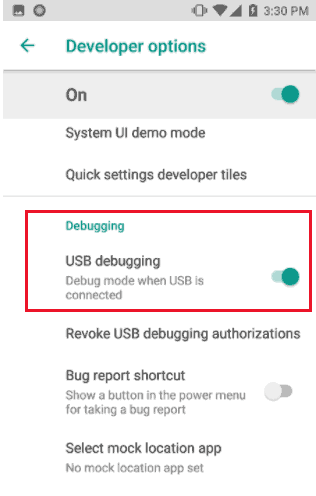
After that, your device will appear in the Android Device Selection window. Select the device and click start the project. Wait until Gradle completes the assembly and installation of the application. Your application will launch automatically once the installation is completed.
The first launch was successful! Moving on. Let's see what happens with our components when you launch your application.
Post a comment
Comments
Nothing yet..be the first to share wisdom.